TFS WitAdminUI is a simple wrapper around the witadmin command-line tool offering various features.
Supported Versions
TFS WitAdminUI currently supports TFS versions:
- 2017 and all updates
- 2015
- 2013
TFS WitAdminUI currently supports VSTS in the following way:
“For Hosted XML and Inheritance process models, you can only use witadmin commands to list information.” MSDN
Usage
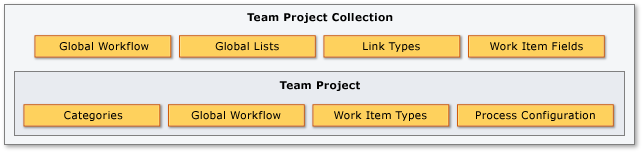
Witadmin is a command-line tool which comes with Visual Studio. As described in MSDN, “By using the witadmin command-line tool, you can create, delete, import, and export objects such as categories, global lists, global workflow, types of links, and types of work items. You can also permanently delete types of work item types, and you can delete, list, or change the attributes of fields in work item. As the following illustration shows, you manage categories and types of and work items for each team project. You manage global lists, types of links, and fields in work item for each team project collection. You can customize global workflow for a team project or a collection.”
When working on customizing a process template, you need to perform several witadmin actions multiple times, and since it is a command line tool, it gets pretty bothersome composing the long commands over and over again with poor support for copy-paste actions. TFS WitAdminUI helps you by automatically generating commands based on the project collection and team project you are connected to. It allows you to preview generated commands with parameters for several witadmin actions, get help on those actions and execute them against the selected project collection and team project.
Note: The application uses witadmin tool from Visual Studio 2013. It was not tested against earlier versions of Team Foundation Server, but it should work due to backward compatibility of the witadmin tool.
Note: The original code was taken from the CodePlex project TFS WitAdminUI, and it was refactored and extended.
Connecting to TFS
TFS WitAdminUI lets you connect to a Team Foundation Server of your choice at load time. You can later change this connection while the program is running by using the Connect button. All commands are executed in the context of the selected TFS connection.
Command Modes
There are 3 different Command Modes:
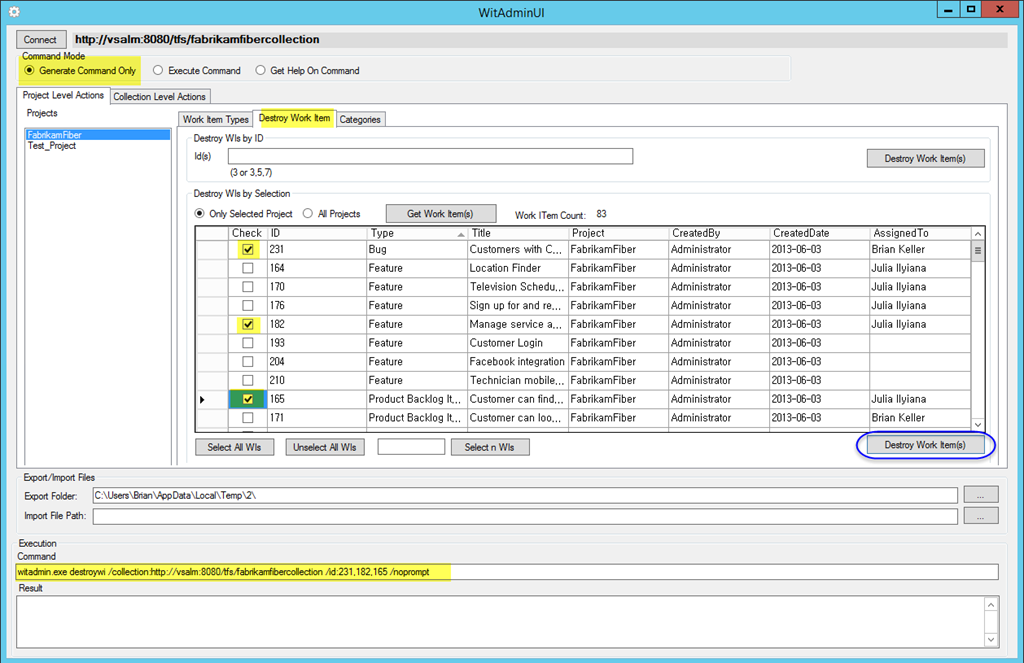
Generate Command Only
Generates the witadmin command-line with appropriate parameters and shows it in the Command edit box in the Execution group at the bottom of the window.
This mode does not execute any commands against TFS!
Execute Command
Generates the witadmin command-line with appropriate parameters and executes it against the selected project collection and team project.
The command is generated using the same code as in the Generate Command Onlymode.
The result is displayed in the Result edit box in the Execution group at the bottom of the window.
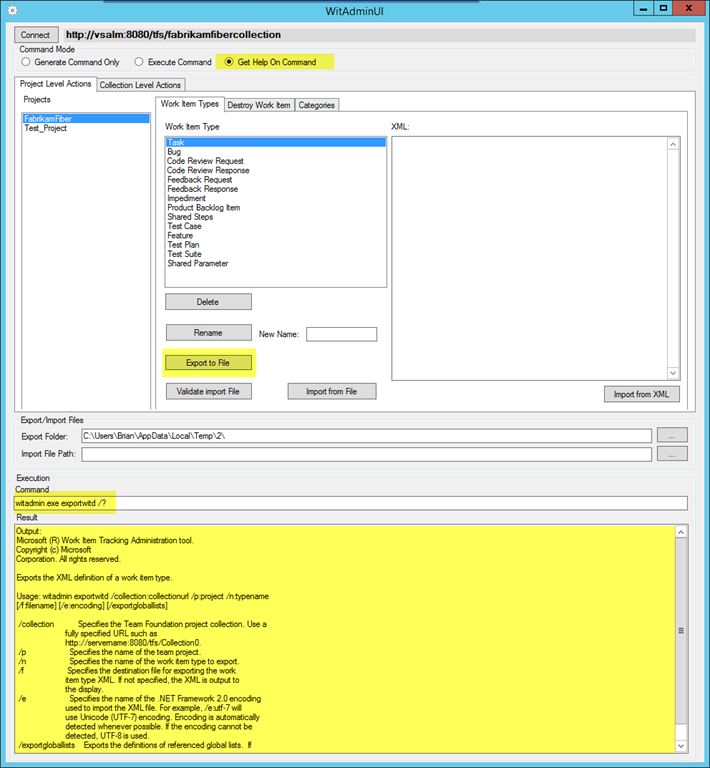
Get Help On Command
Runs the command-line to get help on a particular action implemented in the application. (witadmin [action] /?).
The result is displayed in the Result **edit box in the ** Execution group at the bottom of the window.
Project Level Actions
The tab Project Level Actions contains commands which are executed against a team project. You need to select the appropriate team project in the Projects list.
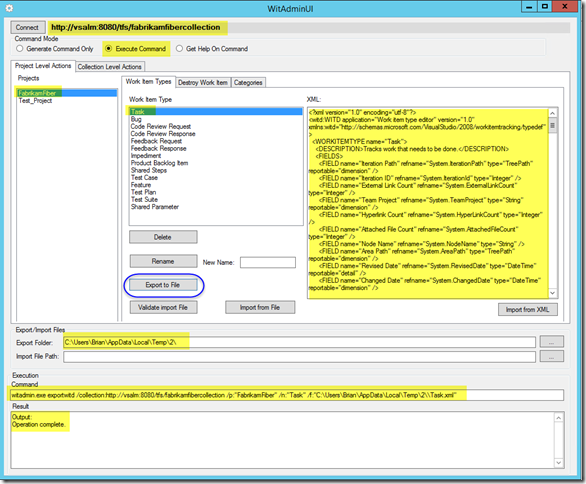
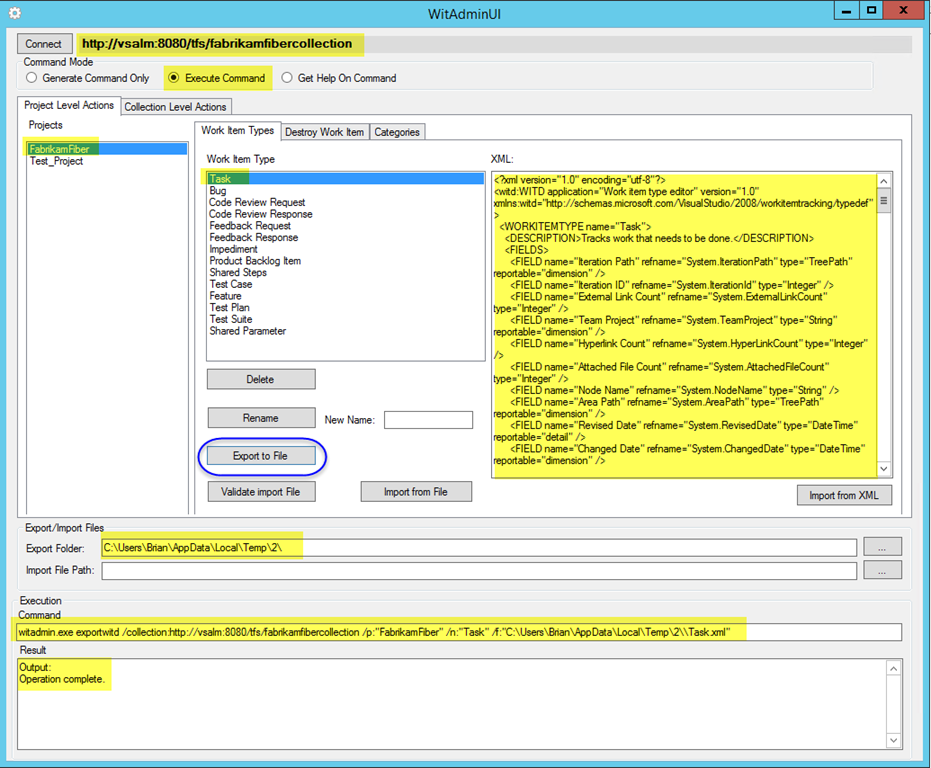
Work Items Types tab
Implements actions related to handling work item types:
- Delete - destroywitd
- Rename - renamewitd
- Export to File - exportwitd
- Validate - importwitd /v
- Import from File - importwitd
- Import from XML - importwitd
All actions are executed against the work item type selected in the Work Item Type list.
When exporting, the path set under Export Folder in the Export/Import Files group is used. The file name is generated based on the work item type name. Additionally the exported file is loaded in the XML edit box.
When importing from file, the file from the Import File Path in the Export/Import Files group is used. When importing from XML, the XML from the XML edit box is used.
Destroy Work Item tab
Implements actions related to destroying work items (destroywi) from the selected collection and projects. You can destroy work items by IDs you manually enter in the Id(s) edit box in the Destroy WIs by ID group.
You can destroy work items by selecting them from the list of work items in the Destroy WIs by Selection group.
Populate the list using the Get Work Item(s) button either from the selected team project (Only Selected Projects radio) or from all team project in the collection (All Projects radio). Use the Select All WIs, Unselect All WIs, Select n WIs buttons to adjust your selection.
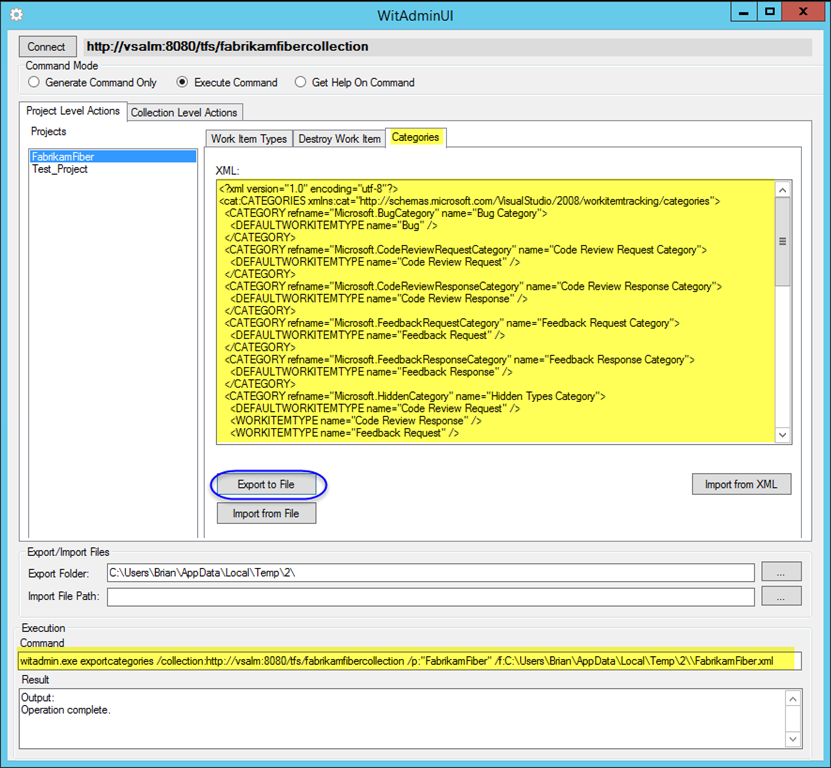
Categories tab
Implements actions related to managing categories for the selected team project:
- Export - exportcategories
- Import - importcategories
When exporting, the path set under Export Folder in the Export/Import Files group is used. The file name is generated based on the team project name. Additionally the Exported file is loaded in the XML edit box. When importing from file, the file from the Import File Path in the Export/Import Files group is used. When importing from XML, the XML from the XML edit box is used.

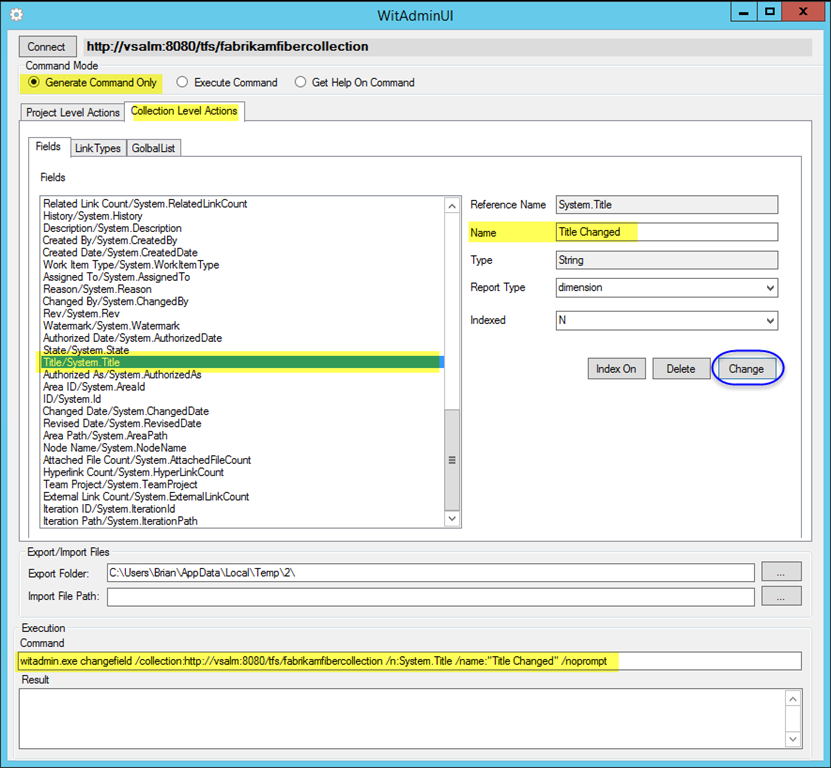
Collection Level Actions
The tab Collection Level Actions contains commands which are executed against the project collection you are connected to.
Fields tab
Implements actions related to handling work item fields in the selected project collection:
- Index On - indexfield
- Delete - deletefield
- Change - changefield
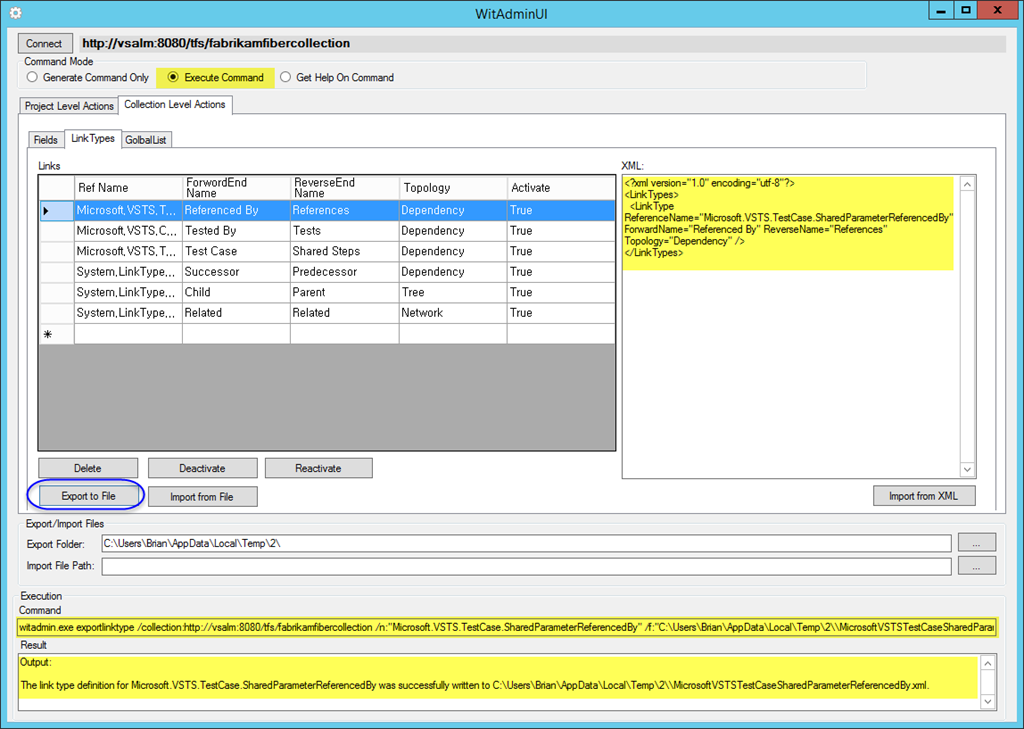
Link Types tab
Implements actions related to managing link types in the selected project collection:
- Delete - deletelinktype
- Deactivate - deactivatelinktype
- Reactivate - reactivatelinktype
- Export to File - exportlinktype
- Import from File - importlinktype
- Import from XML - importlinktype
When exporting, the path set under Export Folder in the Export/Import Files group is used. The file name is generated based on link type name. Additionally the exported file is loaded in the XML edit box.
When importing from file, the file from the Import File Path in the Export/Import Files group is used.
When importing from XML, the XML from the XML edit box is used.
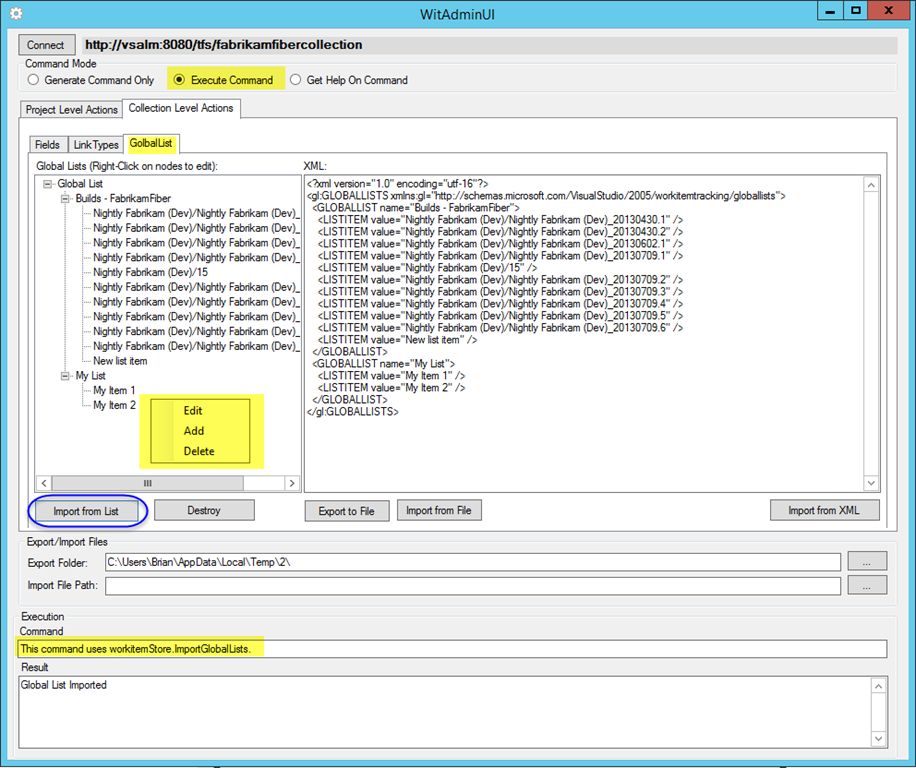
Global List tab
Implements actions related to managing global lists for the selected project collection:
- Import from List - uses method WorkItemStore.ImportGlobalList
- Destroy - destroygloballist
- Export to File - exportgloballist
- Import from File - importgloballist
- Import from XML - importgloballist
When exporting, the path set under Export Folder in the Export/Import Files group is used. The file name is generated based on the TFS server name and project collection name. Additionally the exported file is loaded in the XML edit box. When importing from file, the file from the Import File Path in the Export/Import Files group is used. When importing from XML, the XML from the XML edit box is used. When importing from list, the XML for import is generated from the contents of the Global List tree. By right clicking on a particular tree node you get the options to Edit/Add/Delete that node. The XML imported to TFS is loaded in the XML edit box.